![]()
Some of you may know I have built my own
HeroQuest storage box. Up until now I've always just placed all my minis inside the inlay tray. The trouble was that they always moved around when transporting the box. I needed a way to store my minis safely within the box. I had tried using a foam matress filling (I had some grey foam, looked wonderfully similar to battlefoam), but cutting small sqaures into that was a nightmare, and I messed it up. I also have some styrofoam, which is quite hard but much easier to cut, but I decided against that, as plucking out your minis would be nearly impossible.
![]()
So I rummaged around a bit at work, and found some leftover foam tape. This stuff is used to close small gaps in construction. There's foam that expands and is compressed on a roll, and foam that is already expanded, but can be pressed in. Both work fine. Then I had some leftover aluminium plating cut to the right size for my box, and started sticking the foam tape onto the plate.
I started with the edges, and then did row after row of tape with small pieces as spacers to keep the minis apart. The tape sticks really well on aluminium. It doesn't stick much on fingers, but once it touches the metal, it's hard to pull off without ripping the foam. Great stuff!
I placed my minis on the tray to see how far I could get until I ran out of space. This is a good idea to do, otherwise you might run out of room for your models. It also shows you where your minis might get into eachothers way. Weapons and such stick out, so you need to organize them so they will all fit.
I decided to put certain groups of monsters together so I could squeeze more models in the box. I also wanted a spot for my cards. I will eventually make three boxes for my cards, so I can place them all on the right. This is the result:
It's really nice to see rows and rows of minis, kept snugly in place, not sliding around when you pick up the tray. I made rows for HeroQuest minis, Mantic minis and D&D boardgame minis, as those have slightly different bases.
The tray fits easily in my wooden box, and I left some space on the right side for furniture. I could have put them on the tray as well, but I didn't have any more room for tape inbetween the furniture, and it's really the painted miniatures I was worried about in the first place.
I hope this is useful for those who want to make their own miniature storage box!
 Some of you may know I have built my own HeroQuest storage box. Up until now I've always just placed all my minis inside the inlay tray. The trouble was that they always moved around when transporting the box. I needed a way to store my minis safely within the box. I had tried using a foam matress filling (I had some grey foam, looked wonderfully similar to battlefoam), but cutting small sqaures into that was a nightmare, and I messed it up. I also have some styrofoam, which is quite hard but much easier to cut, but I decided against that, as plucking out your minis would be nearly impossible.
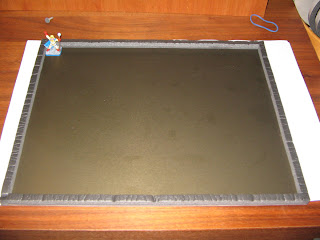 So I rummaged around a bit at work, and found some leftover foam tape. This stuff is used to close small gaps in construction. There's foam that expands and is compressed on a roll, and foam that is already expanded, but can be pressed in. Both work fine. Then I had some leftover aluminium plating cut to the right size for my box, and started sticking the foam tape onto the plate.


